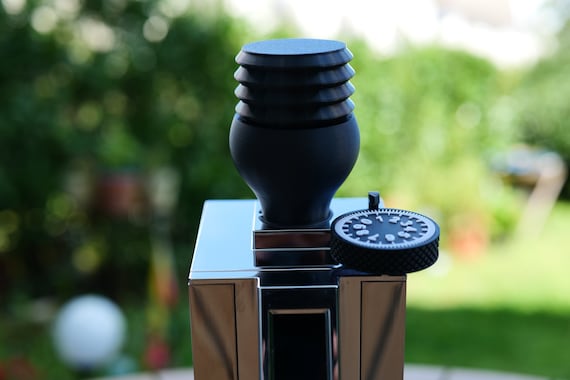
ARO Espresso™ Aluminum Grinder Setting Dial for Eureka Mignon
4.6 (693) · € 19.50 · En stock

Introducing the ARO Espresso™ Aluminum Grinder Setting Dial for Eureka Mignon, the ideal solution for achieving a precise and accurate grind setting on your Eureka Mignon, every time. Gain ultimate control over your espresso brewing process!
Product Description
Watch the set-up and use video here.
*This listing is for the dial and adjustment knob only. Grinder is not included!
Introducing the ARO Espresso™ Aluminum Grinder Setting Dial for Eureka Mignon, the ideal solution for achieving a precise and accurate grind setting on your Eureka Mignon, every time. Gain ultimate control over your espresso brewing process!
This product is designed specifically for the Eureka Mignon series grinders and is durable, reliable, and easy to use. It solves the problem of losing your reference point when switching between grind sizes. Now, you can easily adjust the grind size between espresso, pour-over, and French press grind sizes, and the numbered dial ensures that you can always return to your preferred setting with ease. No more wasting precious coffee to dial in the grind again!
The ARO Espresso™ Grinder Setting Dial and Adjustment Knob is a two-piece tool that is simple to install and will revolutionize the way you grind coffee in your Mignon. The grinder setting dial has 100 increments to ensure that you can dial in your grind size with precision. The grind adjustment knob is more ergonomic and easier to rotate than the stock knob. It uses a 3:1 gear ratio, which means three full rotations of the knob equates to one full rotation through all 100 increments on the dial. This unique feature allows you to make extremely fine adjustments and maximize the performance of your grinder.
Key Features
Solid aluminum adjustment knob: Aluminum is far superior to plastic for this particular application. The aluminum threads ensure the knob never strips, your grind setting never drifts, and will last a lifetime.
Stunning laser engraved aluminum faceplates: With a minimalistic design, matte black finish, and precision laser engraved text, you'll forget that the grinder didn't come stock with this beautiful piece!
Non-marring and non-invasive installation: The faceplates are set into a protective plastic base containing the gear mechanism. This ensures a scratch-free installation while promising smooth and quiet operation.
Matching single dose hopper (optional add-on): Elevate your single-dosing experience and add-on a single dose hopper and silicone bellows that integrates flawlessly with the dial for a unified and seamless look.
Compatibility
In general, this device is compatible with most* Eureka Mignon and Eureka Oro Mignon grinders that have the adjustment knob on the right-hand side.
This includes the Specialita, Silenzio, Design, Turbo, Manuale, Classico, Bravo, Filtro, Filtro Silent, Crono, Brew Pro, Casa, Facile, Notte, Zero, Zero Brew, Libra, Oro XL, Oro Single Dose, Oro Single Dose Brew, Oro Dolce Vita, and Oro Stark
*This item is NOT compatible with the Perfetto due to its non-removable knob.
Please message us with your machine model if you have questions about compatibility.
Set-Up and Use
Installation is a breeze – it's a non-invasive tool that won't damage your grinder and you can remove it at any time. To install, just follow these quick steps:
Begin by emptying and removing the hopper from your grinder. You may need to loosen the screw on the back of the grinder inlet, but there's no need to fully remove it.
Clean any grounds from the grinder inlet and off the top of the machine.
Unscrew the stock adjustment knob by twisting it counterclockwise until it completely unscrews and can be removed from the machine.
Twist on the new grind adjustment knob and tighten it until the knob bottoms out and you feel resistance.
Find the 'zero' point on the grinder (read all additional details below*) with the new knob by turning on your grinder and slowly twisting the knob towards the FINE setting. When the burrs make first contact and begin to chatter, immediately stop tightening the dial and back it off 1/16th of a turn or until the chatter stops. This is your 'zero' point.
On the dial, rotate the gear with the numbers so that '0' is directly under the arrow.
Position the dial over the grinder inlet with the arrow pointing towards you and press down until the dial contacts the top of the machine.
Insert your hopper back into the grinder inlet on the top of the machine.
Secure the hopper by tilting the back of the dial upwards and off the machine so that the hopper installation screw is visible. Use a Phillips head screwdriver to tighten the screw.
Press the dial back down onto the top of the machine.
*It is important that you move very slowly when finding zero. You want to stop tightening the burrs as soon as they make contact. This will not hurt your burrs if they only touch momentarily. The surface between them is flat, so the sharpened burrs do not come into contact.
*If you want to find the zero-point of your grinder without having to turn the machine on, you can simply unplug it from the wall and use your finger to spin the burrs as you tighten the knob. As soon as you feel resistance, you have found the zero-point.
Congratulations! You have successfully installed the ARO Espresso™ Grinder Setting Dial and Adjustment Knob. Enjoy the ability to effortlessly dial in your grind settings and get the perfect grind every time.
To dial in your grind, we recommend beginning with these ranges and adjust as needed:
Espresso: 5-15
Drip/Pour-Over: 40-60
French Press: 70-90
Consider factors like grinder model, bean type, and bean age, as they may require adjustments beyond these starting points.
What's in the Box?
Grinder setting dial with aluminum faceplates
Solid aluminum geared adjustment knob
Single dose hopper with silicone bellows (optional)
Other Useful Info
A note on grinder cleaning: To remove the top plate of your grinder for cleaning, you'll need to temporarily remove the geared knob due to its larger diameter. Upon reassembling your grinder, simply reinstall the knob and recalibrate to your 'zero' point as outlined above. While this extra step may initially seem cumbersome, it's a recommended practice to perform the dial-in process each time you disassemble your grinder for cleaning. Plus, with the enhancements of this dial, pinpointing your 'zero' setting and dialing-in your grind setting takes under two minutes. The day-to-day convenience of always knowing your precise grind setting significantly outweighs the occasional need to remove the knob for cleaning.
To clean the dial, use a damp cloth. The knob can be submerged and cleaned with soapy water. No dishwasher!

55mm Espresso Burrs for Eureka Mignon Specialita, Design, Zero, Libra. MAC55ITAv1802 CP. (Espresso): Home & Kitchen

Eureka Mignon Notte Espresso Grinder (Black) Uzbekistan

ARO Espresso Grinder Setting Dial and Knob for Eureka Mignon

55mm Espresso Burrs for Eureka Mignon Specialita, Design, Zero, Libra. MAC55ITAv1802 CP. (Espresso): Home & Kitchen

Eureka Mignon Grind Setting Dial files are online and free! : r/espresso

CAFEMASY Single Dose Hopper Bellow and Silicone Tamping Mat with Cleaning Brush Espresso Tamper Station Compatible for Eureka Mignon Grinder: Home & Kitchen

FusedLine Grinder Setting Dial for Eureka Mignon

Eureka Mignon Notte Espresso Grinder (Black) Uzbekistan

Eureka Mignon dial rant (2023) : r/espresso